February 25th, 2014: Horses in Chinese Style
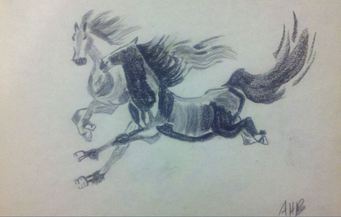
I've taken far too long of a hiatus from art. It's been over ten days! In any case, I've finally sat myself down and forced myself to work on my Arts and Humanities Capstone again. I previously used a Chinese medium to make a piece in a Western style, so this time I decided to do the opposite and use the Western medium of charcoal to make a piece in a Chinese style. Since I'm mildly obsessed with horses, I chose these animals as my piece's subject.
I'm fairly pleased with the way this one came out. It's really hard to mimic brush strokes with charcoal, I learned. As a result, the light and dark values look rather disjointed, rather than natural as they would had they been done in ink. But even so, I like the way it came out. It was quite successful in that I was able to capture the Chinese style, with a sort of minimalist piece with few strokes used to capture the essence of the horses. It's not a perfect likeness that is anatomically correct, because in this style, it's not really meant to be.
I'm fairly pleased with the way this one came out. It's really hard to mimic brush strokes with charcoal, I learned. As a result, the light and dark values look rather disjointed, rather than natural as they would had they been done in ink. But even so, I like the way it came out. It was quite successful in that I was able to capture the Chinese style, with a sort of minimalist piece with few strokes used to capture the essence of the horses. It's not a perfect likeness that is anatomically correct, because in this style, it's not really meant to be.
February 14th, 2014: Ink Flower
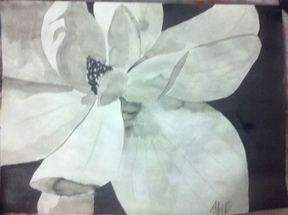
I finally convinced myself to get started on my Arts and Humanities Capstone project yesterday. I wanted to see if I could use the Chinese medium (ink) to create a work in a Western style. It turns out I can! I painted a flower (I don't know what type of flower it is) on a regular sketchbook page. All of the moisture in the ink and water made the paper curl pretty badly, which is a pain, but I hope that it will straighten out if I weight it with something.
I'm pleased with the way this piece came out. The shading worked nicely. And with the black background, it will go nicely with the charcoal flowers I've done recently. I seem to have unintentionally developed a pattern.
My next steps, which I'll probably take today, are to try drawing in charcoal in a Chinese style, as well as to see how well charcoal sticks to the Chinese paper. My results of these attempts will be posted soon!
February 10th, 2014: Charcoal Lily

I was so pleased with the way my charcoal rose came out that I decided to try another piece with a similar style. This time I chose a lily as my subject. Just like the rose, this flower was done in vine charcoal. Because it's so hard to get dark values with the soft vine charcoal while still having it blended, I wanted to repeat the black background to contrast the lightness of the flower. The background was done in compressed charcoal, like the background of the rose.
Overall, I'm pleased with this piece, although the leaves and stem are not my best work. The values were very dark, so it was more difficult to differentiate the values. This caused these parts of the piece to be somewhat flat.
In any case, I just got some oil pastels, so my next project is to mess around with those some and see what I can do with this new medium. That will probably happen on Wednesday.
February 5th, 2014: Tree with a Sunset
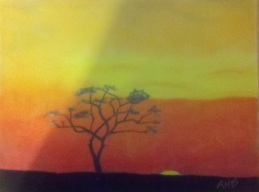
My plan for the day was to test out the remainder of my new art supplies, but despite my best efforts, I just wasn't feeling very artistic today, so I don't have anything to show for that. Also conté is just intimidating to me for some reason. So instead of trying to fight with my artistic abilities of the day to create something with my new art supplies, I decided to go with something I was more familiar with. I broke out the pastels again. Another sunset (I just love yellows and oranges). I'm very pleased with the background, but less so with the tree. It was very small so it was very difficult to get the black to cover well or to get the level of detail I wanted. All in all, it's not too bad though. I might play with some vine charcoal again later tonight if I'm feeling more artistic. We'll see.
February 4th, 2014: Charcoal Rose
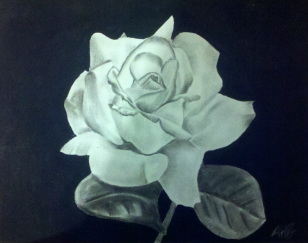
Early last week, I ordered all of the art supplies I may need for my Arts and Humanities Capstone, including: compressed charcoal, vine charcoal, charcoal pencils, conté, and workable fixative (I already have final fixative). These supplies arrived Friday afternoon, but my day was rather busy, as was most of my weekend. Yesterday, however, I had plenty of time, so I got to work "testing" my new materials (and by that mean "playing with my new toys"). I wasn't sure what to expect with the vine charcoal, which I used for this rose. I wasn't overly fond of the brand we used in my art course, but I knew nothing about other brands, so I ended up guessing and going with Grumbacher; this guess turned out great, as I really like the charcoal I received. It worked very nicely and easily. I'm also quite pleased with the compressed charcoal, which I used to fill in the background of this piece; it was exactly what I was looking for. As of yet, I haven't gotten to test my new pencils, conté, and fixative, but I plan to change this very soon. I should have plenty of free time tomorrow, so I sense some art in my future!
February 1st, 2014: New Chinese Painting Gallery
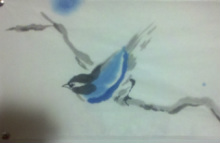
I finally got around to creating a new gallery and adding all of my Chinese paintings to the site! There are more of them than I realized and that's even with a few missing (I don't know where they went! :/ ). Most of them are from the Fall of '12, but there's maybe a couple of new ones, like the pretty birdy shown here! The bird is from just last semester. I hope to get back into painting this semester, so hopefully there will be even more new ones! :)
September 5th, 2013: Finished Sibb Sign
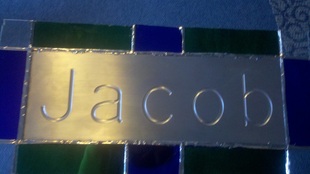
Yesterday I finished the nameplate for my Sibb, Jacob. The center is a milled aluminum plate. The border is blue, green, and clear stained glass. The edge is just the raw glass edge. The pieces didn't like up perfectly, so it was difficult to get any caming to fit on the piece. Also, since the aluminum plate won't adhere to solder, I wrapped it in copper tape just like the glass. Overall, the project took about 6.5 hours. It was totally worth it. I'm very happy with how it came out. And I think my Sibb liked it too!
August 30th, 2013: New Drawing Gallery
Today I created a new gallery for all of my drawings. So far I have a couple of fifteen minute drawings I did of actresses, as well as my self-portraits and my Mega-Object drawings. I'll update the gallery with the many other drawings I did this past semester as soon as I move in and unpack so I can take some pictures of them.
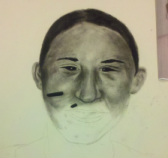
August 14th, 2013: Self-Portrait Completed
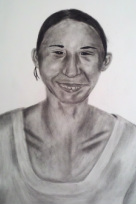
This morning I finished off my self-portrait project. Overall, I'm not happy with it. I like how most of the face came out but the mouth and neck and sweater kind of suck. The mouth I think was just too small of an area to capture accurately with the charcoal I was using, so I think it's okay given the circumstances. But I'm still not particularly pleased with that section. With the neck and sweater, I think it was too difficult to get an even tone and good shading with such light values. It was nearly impossible to get the charcoal to draw that lightly. So, overall, this was a very difficult piece, and I'm not very happy with the way it came out. I hope I can make a better self-portrait someday.
August 1st, 2013: Housewarming Gift
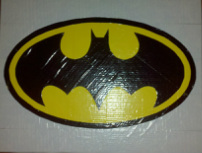
My best friend, Steph, is moving into a new apartment today. I was going to go over to help the move-in efforts, but I wanted to bring a housewarming gift. My other friend, Michael, has gotten me hooked on duct tape art recently and Steph loves superhero comics, so I decided to combine the two. I made her a batman duct tape poster this evening to hang in her new apartment. I hope she likes it! We'll find out tomorrow when I give it to her.
July 30th, 2013: More Progress on the Self-Portrait
Yesterday, I got started with the charcoal on this project. Tonight I'm going to try to power through and finish it. We'll see how that goes. But so far I'm making good progress. The ears look a little off to me, but who needs ears anyway? Overall, I like how this portrait is coming out. As I started to fill in the eyes, though, I realized that the angle of my eyes and the angle of the rest of my face were not the same. So I had to do a bit of last minute erasures and redrawing. But I think the angle issue is worked out now. Only time will tell at this point.
July 29th, 2013: Progress on the Self-Portrait Project
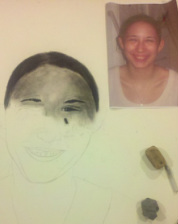
A few nights ago, I chose and printed out a picture to work from. Now, this drawing is supposed to be from real-life observation, so don't tell! Anyways, I spent an hour or so one evening outlining the portrait. Just this evening I finally got started with the charcoal. I started from the top, working my way down. As I did so, I noticed that the part I've already filled in seems to be at a different (more vertical) angle than the lower outlined section. When I come back to it, I'll have to adjust the remainder of the outline to match. I'm not really sure just yet how much of a problem this will be, but I'll find out tomorrow evening! My plan is to power through and finish it tomorrow, but I'm not sure how that's going to go. I'll do my best.
July 19th, 2013: Mega-Object Drawing Completed!
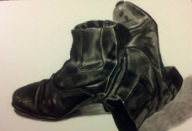
Just this evening I finally finished my Mega Object Drawing. Overall, I quite happy with the way it came out. The zipper on the right boot looks wrong to me, though, but I can't decide why that's so. Other than that, I'm pleased; and I'm never pleased with my artwork, so that's saying something! Now I just need to decide if I will give it to my parents or if I love it too much to part with it. Hmm, tough decisions.
New Website to Follow!
I'm a big fan of the fiber arts: knitting, crocheting, spinning, weaving, and more. My mom is too. She recently started a website of her own to chronicle her projects. Check it out! Soon she'll be making and selling various looms and drop spindles. It's going to be great! So go check it out at Cape Cod Loom Girl.
More Progress on the Mega-Object Drawing
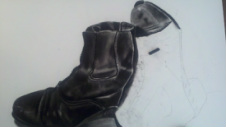
After a short hiatus, I'm back to working on my Mega-Object Drawing. I have since finished the first boot and filled in the toe of the second boot. I'm now almost two-thirds done!. Overall, I really like the way it's coming out. Progress is slow though. There seems to be so much pressure on this one drawing to be totally excellent and it's extremely stressful. I can only work on the drawing in short chunks of time; otherwise I get myself too worked up over it.
Magic Wipes
Seriously, these wipes are like magic. They cleaned the black from the charcoal right off my hands. I expected them to just smear it all over the rest of my hands, but they didn't. They just wiped away the charcoal and that was that. New favorite product. I'll be making a trip back to Lowe's to get some more very soon I think.
Progress on the Mega-Object Drawing!
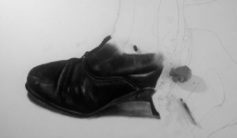
I've finally gotten my act together and started on the drawing for my Mega-Object Drawing Project. First, I arranged my riding boots and sketched them out on the final paper using a mechanical drawing pencil. Then I just went to town with the charcoal and started filling in large sections at a time. I blended the charcoal mainly with my fingers, but I used blending stumps to get the sharp edges. The shadows I blended with my finger to get a fuzzier edge to give it a shadow-like character. To make the highlights, I used a kneaded rubber eraser. I spent about three hours getting this far. All in all, I love how it's coming out!
Turns Out You *Shouldn't* Heat Salt and Solder Together
If you do, you end up with weird solder bubbles like this amid a mass of fused salt. And then you are very sad because you have to spend a long time trying to clean out the crucible by dissolving out the salt. So much for that bright idea... Back to heating them separately and sketchily combining them in a muffin tin. Oh well. It was worth a shot to try to simplify our lives, even if it did end up backfiring.
A New Website!
I have no idea how to do web design, though... I'm working on it. :)
